How to Build a Gaming PC on a Budget for Sports Sims
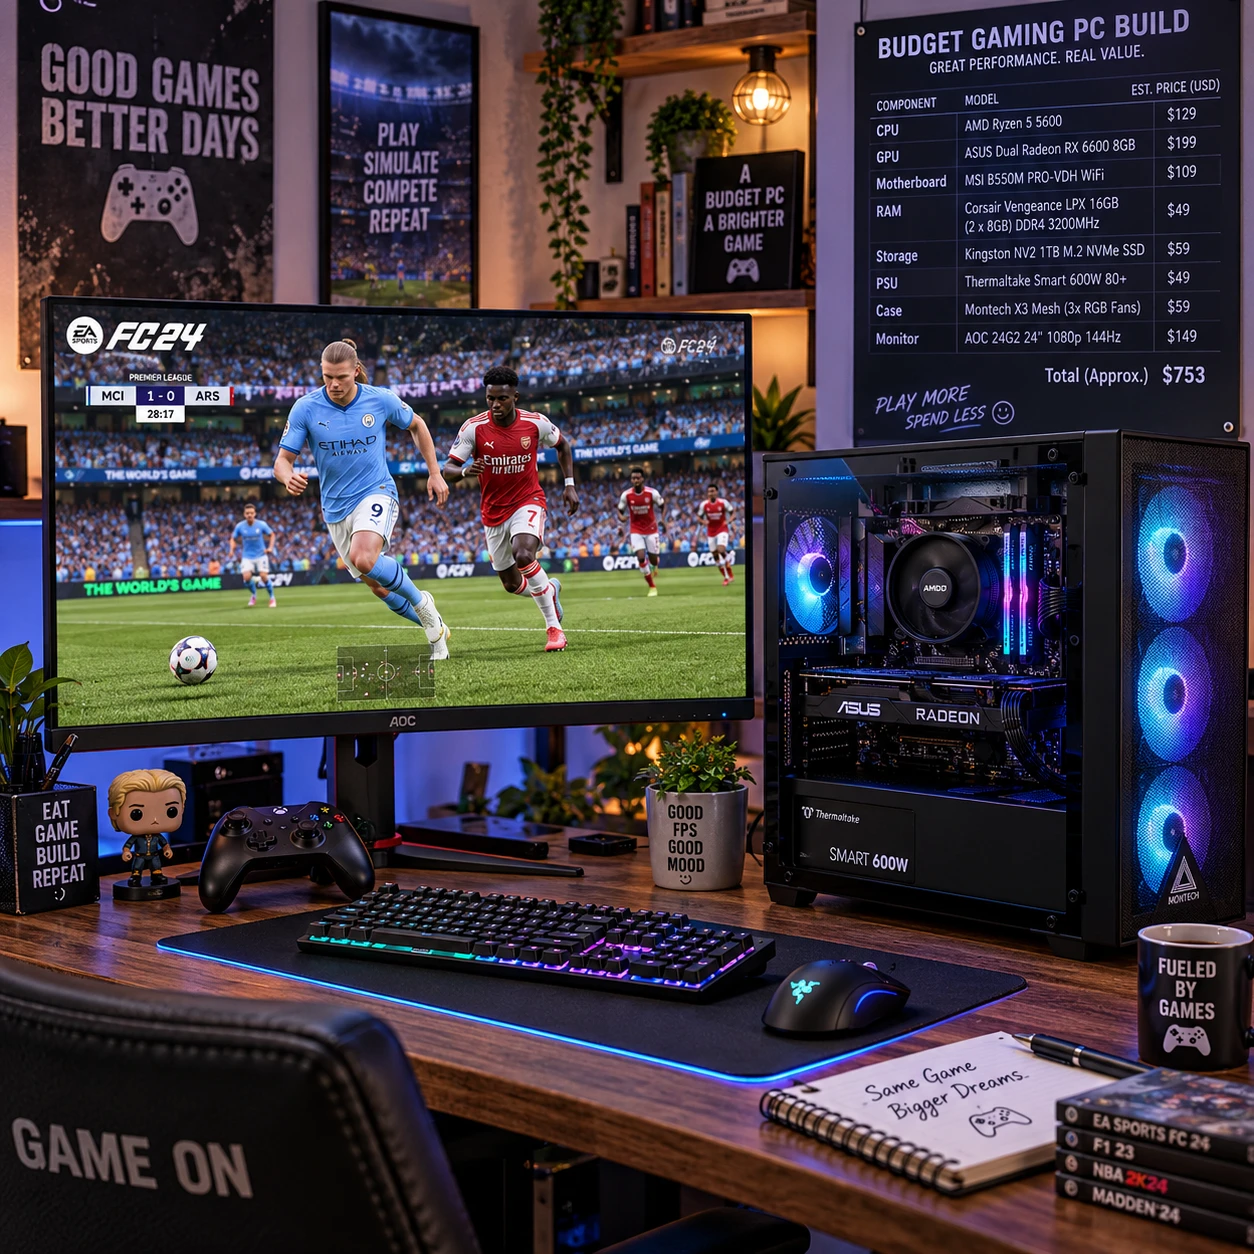
A budget PC for sports simulation games should deliver steady, responsive play in the titles you actually enjoy, without spending extra on power you may not use. A sensible build balances the CPU, graphics card, RAM, and SSD, while keeping component compatibility and future upgrades in view.
Start with your games and display, then shop around for parts that meet those needs. Sports sims vary: a management-heavy game can lean more on the CPU, while a detailed match or racing simulation may benefit more from a capable GPU. There is no single perfect build for every budget or title.
Set a Realistic Budget and Performance Goal
Set your total budget and target resolution before choosing parts. Your sports sims, monitor, and expectations for frame rate will determine where each dollar does the most work.
Include the whole setup in your budget, not only the tower. If you already own a monitor, keyboard, mouse, and Windows license, you can put more toward the PC. If not, reserve money for those items, plus any taxes, shipping, or small accessories a build may need.
Next, check the recommended system requirements for the specific sports sims you plan to play. Minimum requirements can indicate whether a game will launch, but they do not promise a consistently smooth experience. Consider your display, too:
- 1080p at a moderate frame rate is a practical target for many entry-level builds. A higher frame rate can make controls feel more responsive, but actual results depend on the game and parts.
- 1440p or high refresh rates typically demand more from the graphics card and can raise the cost. Choose these goals only if your games and monitor make the difference worthwhile.
- Simulation depth matters: large leagues, detailed crowds, complex physics, and background calculations can affect performance differently from one game to another.
Write down a realistic goal, such as playing a named game at 1080p with stable performance on settings you find comfortable. That gives you a useful basis for comparing parts, rather than shopping by price or model name alone.
Know Which Components Matter for Sports Sims
The CPU, GPU, RAM, and SSD each affect a different part of the experience. Prioritize them according to the sports sims you play, since a fast graphics card cannot compensate for every processor or memory limitation.
The CPU handles game logic, player and team calculations, physics, and other tasks. Management simulations or games with busy match simulations may put substantial work on the processor. Check reviews and requirements for your particular title before deciding how much to spend here.
The graphics card (GPU) draws the stadium, players, lighting, and effects. It usually has the clearest impact on visual detail and resolution. If your goal is 1080p, an affordable current or recent GPU may be a better fit than paying a premium for high-end performance you will not use.
RAM gives the game and operating system room to work. For a new budget build, 16 GB is a sensible starting point for many gaming setups, but confirm the requirements of your chosen games and leave capacity for other apps you keep open. Two matching memory sticks can enable dual-channel operation on supported systems; check the motherboard manual for the correct slots.
An SSD stores the operating system and games. It generally makes booting and loading feel quicker than a traditional hard drive, though it does not automatically raise in-game frame rates. A 1 TB drive can offer useful space if the price fits; a smaller SSD is reasonable when you mainly play a few games and can add storage later.
Choose Budget-Friendly, Compatible Parts
Choose parts as a compatible system, not as isolated bargains. Confirm that the CPU, motherboard, RAM, GPU, case, and power supply fit together before placing an order.
Start with the CPU platform and motherboard. The board must support the processor’s socket and, depending on the model, may need a suitable BIOS version. Check the manufacturer’s CPU support list, especially when pairing an older motherboard with a newer processor. Then confirm the board supports your RAM type and desired memory capacity.
Check the graphics card’s length against the PC case’s clearance, and make sure the case has room for the CPU cooler. A compact case can save desk space, but it may limit component size and make cooling or assembly harder. A straightforward mid-tower often gives first-time builders more room to work.
The power supply (PSU) needs enough capacity for the complete system and the correct connectors for the GPU and motherboard. Use the GPU and PSU manufacturers’ guidance rather than guessing from wattage alone. Choose a reputable unit with appropriate safety and efficiency certifications; a very cheap, low-quality PSU can put the rest of the build at risk.
For future upgrades, look for a motherboard with the slots and ports you expect to use, a case that can accept a larger GPU, and a PSU that leaves reasonable headroom. That flexibility costs something up front, so avoid paying for features you have no plan to use.
Save Money Without Creating Bottlenecks
Save money by trimming features you do not need, not by weakening a part that limits the whole system. Compare complete build prices and think about how each compromise will affect your sports sims.
Useful savings can come from choosing a modest case, skipping decorative lighting, reusing a compatible monitor or storage drive, and buying a smaller SSD that you can expand later. You might also consider a previous-generation CPU or GPU if independent reviews show it handles your games at the performance level you want.
Used components can offer value, but condition and seller reliability matter. Ask for the exact model, proof that the part works, and a clear return option where possible. For a used GPU, look for signs of damage and test it under load soon after purchase. Avoid deals that cannot be verified, and be cautious with used PSUs: their age, history, and wear can be difficult to assess.
Remember costs beyond the core parts. A missing operating system, extra case fan, Wi-Fi adapter, or shipping fee can push a low advertised build over budget. A cooler may also be needed if the chosen CPU does not include one. Check the box contents and motherboard features before buying add-ons.
A common mistake is pairing a strong GPU with an entry-level CPU because the GPU appears to matter most. That can leave some CPU-heavy simulations underpowered. Another is buying the cheapest PSU available to protect the budget; the savings are small compared with the risk. Compare the parts as a whole and keep a little money aside for unexpected needs.
Assemble the PC and Install Essential Software
Assemble the PC in a calm, step-by-step order, then install the operating system and current drivers. Read the motherboard and case manuals as you go; their diagrams are more reliable than assumptions about connectors.
- Work on a clear surface and take basic precautions against static discharge. Lay out the parts and verify the CPU, RAM, SSD, and cooler are compatible.
- Install the CPU, RAM, and M.2 SSD on the motherboard before placing it in the case. Follow the CPU alignment marks, and do not force any component into its slot.
- Fit the motherboard into the case, then install the PSU and connect the required power cables. Mount the cooler according to its instructions and connect its fan to the correct motherboard header.
- Install the graphics card in the recommended PCIe slot and connect its required power leads. Attach the case’s front-panel, USB, audio, and fan connectors using the motherboard manual.
- Check every connection before powering on. If the system starts, enter the BIOS or UEFI to confirm that the CPU, memory, and SSD appear correctly.
Install your operating system from a legitimate source, then install motherboard chipset and network drivers and the latest stable driver for your GPU. Run system updates and check that the monitor is set to its intended resolution and refresh rate. Avoid changing BIOS settings you do not understand; enable a memory profile only if the components support it and the system remains stable.
Tune Settings and Test Performance
Tune graphics settings in the sports sims you play and test stability during realistic gameplay. Start with recommended or medium settings, then adjust the options that matter most to your experience.
Lowering demanding effects such as shadows, reflections, or crowd detail can improve performance, depending on the game. If the picture looks good but motion feels uneven, check frame rate, frame pacing, and whether the game is running at your monitor’s native resolution. A frame-rate cap can help maintain steadier output on some systems, but the best setting depends on the game and display.
Test more than the title screen. Play a full match, race, or simulation sequence with the settings you expect to use, and note whether performance drops in busy scenes. Check temperatures and watch for crashes, visual glitches, or unexpected fan noise. If a problem appears, confirm drivers and connections first, then change one setting at a time.
Keep a simple record of game, resolution, graphics settings, and observed performance. This makes it easier to spot whether a future upgrade to the GPU, CPU, or RAM would address a real limitation. Avoid promising yourself a particular frame rate based on someone else’s build: game updates, stadium or track scenes, drivers, and background tasks all affect results.
Frequently Asked Questions
These quick answers cover common choices for a first budget sports-sim PC. Always check the requirements and compatibility for your exact parts and games.
How much RAM should a budget sports-sim PC have? For many new builds, 16 GB is a practical starting point. Check each game’s requirements and consider more if you routinely run several demanding applications alongside it.
Is a dedicated graphics card necessary? Not always. Some games can run on integrated graphics, but performance and visual quality may be limited. Check the exact game requirements and reviews before relying on integrated graphics, especially if you want higher resolutions or detailed settings.
Which parts are easiest to upgrade later? RAM, SSD storage, and the GPU are often straightforward upgrades, provided the motherboard, case, and PSU support the new parts. CPU upgrades depend on the motherboard socket and BIOS support.
Should I buy used PC components? Used parts can lower the cost, particularly when you can verify condition and test them. Factor in warranty, return options, age, and seller reputation; a low price is not a bargain if a part fails or cannot be checked.
For a dependable budget gaming PC, match components to your sports sims and performance target, verify compatibility, and leave room for sensible upgrades. A balanced system with tested settings will serve you better than one expensive part surrounded by compromises.